

 Posts


8:12 PM Posted In crafting , garb , geek , history , SCA , sewing Edit This 1 Comment »
Anyone who tells me that the only period appropriate materials for an
outer garment are wool and silk can expect a verbal bitchslap, complete
with documentation. Not to mention the fact that the northern Pacific
coast is NOT IN THE MIDDLE OF A MINI ICE AGE! It's ridiculous to expect
anyone to wear wool layered over linen and undergarments in the middle
of summer. And no, that doesn't mean that I should just give up and
make a "modern" cotton bliaut. It can still be period if made in
linen. And linen isn't that expensive if you hit fabrics-store.com's weekly sales, happy hour, and/or their discount code (ilovelinen).
Don't mind me, I got a little worked up over an authenticity nut.
Why Norse Garb is so Popular in An Tir
3:48 PM Posted In crafting , garb , history , medieval , SCA , sewing Edit This 0 Comments »First of all: layers. Layers lend adaptability to An Tir's weather, which is only predictable in that one should always be prepared for cold and rain. But on the chance that we are blessed with clear, warm weather, heavier outer layers can be shed in favour of linen underlayers.
It's comfortable! Who wants to fuss with dragging trains, multiple skirts, and trailing sleeves while camping?
Wool was the predominant fiber choice, and we all know wool's wonderful qualities, namely it's absorbency and water-repelling abilities. Very helpful if you are facing the prospect of hypothermia on Independence Day.
Durability. This month marks my one year anniversary of playing, and I have made it through the year with only my Norse gear and a spare gown. My infamous green tunic (so named because Máel Brigte is difficult for people to pronounce and they always recognize me by my garb) only has a small grease stain. My original apron dress was recycled a few months ago for many reasons, none of which were related to questions of durability. Keep in mind that these have withstood grease, sweat, mud, dust, sun, wind, and rain.
There are many methods and styles of decoration: beads, woven trim, and embroidery. As well as the accessories.
The Norse were famous for their martial prowess, and it's not difficult to make a fighter's kit (at least not in comparison to, say, Gothic plate).
In short, it's fun, practical, and an easy persona to slip into for an entire weekend.
Cyclas
12:37 PM Posted In crafting , garb , history , medieval , SCA , sewing Edit This 0 Comments »I picked up an aqua linen remnant for $4 a yard. After washing and drying it was just long enough to brush the tops of my feet and my Achilles heel. After long agonizing, I decided to go with a cyclas, or sideless surcoat. While most surviving art indicates that most were cut long in the back, the figures were typically nobility and/or wearing Sunday best. Anyone else would have worn theirs at a more sensible length. At least, that’s my logic train and I’m stickin’ to it. That and this is Oregon: I am hardly going to drag good linen around in the mud unnecessarily.
I followed these directions, using the gores but not the train. I began with the fabric doubled over, and I then folded that in half so that my cuts would be mirrored. This is not recommended if you do not have a really good pair of scissors and/or really strong hands. From the center fold I measured out half my shoulder width plus seam allowance, which was 8 inches.
I pinned through all the layers straight through to the carpet, marking out all my cutting lines with more pins instead of drawing. It helps keep all the layers where they should be when cutting.
Veil Part II
12:50 PM Posted In crafting , DIY , garb , head covering , history , main stream media , SCA , sewing Edit This 0 Comments »
The veil came out kinda crappy, but I am still posting pictures so that you can see that I wasn’t exaggerating about my lack of sewing skills. I can do design and draping, however.
The scrap that came from the first cut was approximately 13x36” and looked perfect for a wimple. I measured my head from under my chin to the top of my head, which was 25 inches. I trimmed off the excess ten inches of length, leaving an extra one for seam allowance. I sewed the short ends together so I could slip it on rather than dealing with even more pins on the top of my head, but at least this time it was all straight lines.
I will wear the braids coiled around my ears for the appropriate silhouette, so I can pin through both the veil and wimple into the fake hair pieces.
Veil
1:55 PM Posted In crafting , DIY , garb , head covering , history , medieval , SCA , sewing Edit This 0 Comments »I picked up a yard of cream Silk Essence at Joann Fabrics, it’s not true silk but I feel that it will pass the ten foot rule. Fine silk, not dupioni or noile, is fairly difficult to find in stores and I am highly averse to ordering online. You want the chosen fabric to be slippery so it won’t create friction with your clothes and catch, trying to tug your head back and the whole thing off your head. And the finer it is, the better the silhouette.
 I measured across my head to about where I wanted it to hang, which ended up being about shoulder-length. Then I measured to where I wanted it to fall down my back. My measurements were 26x31”, and after seam allowance they came out to be 27x31”. I cut out a rectangle this size, which I folded into quarters. Starting at the short end of the rectangle I cut a curve to the long side to form an oval when unfolded.
Now comes my least favourite part. I folded the hem under, which is damn frustrating with curves. Hand-stitching looks best, even with my horrendous handiwork. I used a whipstitch so that the least amount of thread showed on the top, hiding the majority of my atrocious sewing. I started on one of the long edges because it was easier to get the feel for it before the shorter and therefore more complicated curve.
Today's Project: Hosen!
1:48 PM Posted In crafting , DIY , garb , history , medieval , SCA , sewing Edit This 0 Comments »So the skirt has been dissected, the wool dyed, and I finally mustered the courage to take scissors to it. I did a little online research, and used Racaire's blog as a general overview before diving in with a flat sheet picked up at Goodwill. Draping is difficult to do on yourself, but I have had experience tailoring clothes on others.
First, I draped it over my leg along the bias and then went to town with some pins, following the curve of my calf. Where it began to bunch up over my instep, I cut to correspond more or less to hers. Then I did the same for my actual foot. Be careful of the pins when you bend your leg! That is, unless you are lucky enough to have an assistant.
I trimmed the excess fabric away, accounting for seam allowance. Then I used that as a pattern to cut out the wool, again on the bias. I took the resulting wool pieces and pinned them around my leg, trimming as necessary. The final pieces were traced out on more of the cotton sheet to be used as a master pattern for the other leg and in the future. If you do this, make sure to mark them with a permanent marker so you don’t mistake them for scraps.
I was too lazy to make lining, and the wool didn’t really need it. If I need to, I’ll cheat and use knee-high socks underneath. If you want to then just use the master pattern with whatever material you’re going to use. Naturally, linen was originally used, but I personally would cheat with some of that cotton sheet, albeit in an appropriate colour.
I got as far as making the pattern and cutting today, I will post again once I get to actual construction. I will post pictures, most likely tomorrow. By the way, can you tell that I got a camera for Yule?
Dye Monkey, That Funky Monkey
11:47 AM Posted In crafting , history , SCA , sewing Edit This 0 Comments »One year in college while in the theatre department, I earned the nickname of “Dye Monkey.” I was the head costumer on Victor/Victoria, and one of the characters was dressed entirely in vomit-inducing pink throughout. One of her costumes was a pin-striped suit, but the fabric they sourced for it was white. I spent days in the tiny laundry room hunched over a hotplate with strips of polyester and various packets of dye trying to find the perfect combination of red, orange, and yellow to make Barbie pink.
Grey was typically used by religious orders, as well as brown and white. While the grey wool with a touch of spandex is perfect for hosen, I preferred black. Black as a dye was more expensive, but I think it would have been just fine for accessories. The problem is predicting how the blend will take the dye.
 I have a tiny pot that I use for making soap and other non-food purposes. (Yes, that is my cauldron on the back burner). Popped that on the stove and heated some water and black Rit dye to a light boil. You really don’t need hardly any for test strips. I highly recommend using rubber gloves because dye is related to glitter, being the herpes simplex of the textiles world. I was lazy and didn’t, which in hindsight was playing with fire because I have a job interview on Wednesday. I took the waistband pieces and draped it over the edge into the dye for a couple minutes.

Rinse thoroughly and let dry. A hairdryer can facilitate the process for the impatient. Wait until it is dry before you begin assessing the colour because it will change.
My wool came out more of a charcoal, but I’m fine with that. Natural black dyes, such as from walnut, would easily fade. If I had, had more dye then it would have been darker; see aforementioned impatience.
Fabric on a Dime
4:38 PM Posted In crafting , DIY , garb , history , SCA , sewing Edit This 0 Comments »Wool and linen out of season can easily cost $25 a yard. With a bit of patience and a little research you can glean thrift stores for material. Wool skirt with a touch of spandex from Goodwill: $6.99. Pure linen skirt: $6.99. Black leather jacket: $9.99. I was even eyeing a gorgeous fur coat of hideous design for $14.99; since the warm weather has set in I decided to hold off. Add a seam-ripper and an afternoon of NCIS episodes later you have raw materials. Seam-rippers have a bad reputation. But you are not undoing hours of your own hard work, you are rescuing precious fabric! (Pre-serged edges are another bonus).
True, you are unlikely to get a 45” wide expanse of untouched fabric, but don’t let that stop you. Since materials were expensive and labour was cheap, old clothing was repurposed whenever possible; often multiple times. Their looms were not very wide to begin with, resulting in garments that used fabrics conservatively. For example, the wool used in the Bocksten cloak was woven on a loom 23.6 inches (60 cm) wide.
It’s best to start out with some projects in mind so you don’t stand around wondering what you could make out of that wool skirt. An idea will inevitably occur to you and you’ll end up spending more money than you originally intended, defeating the purpose entirely. Unbelievable as it may be, I have little to no garb. So I was looking for some contrasting linen for edging on a T-tunic or possibly side-less gown, wool for a chaperone or ideally a pair of hosen, and leather for turn-shoes.
Ideal clothes for this are plus-sized with as few seams as possible in colours appropriate to your persona. I start off in the dress section and run my hand along the rack, stopping if I see or feel something that might work. I do this to cut time because finding the fiddly little tags can be annoying, if they are even intact. With some experience you can identify wool, linen, and leather by sight, feel, and even scent. (Just don’t try sniffing those boots to see if they’re really leather). Remember that you will not be wearing the product as is; so while you may not wear that coral dress cut like a potato sack, it’s perfect for your needs.
The bedding section is worth a look, but don’t get your hopes up. It’s mostly cotton. Unless your persona is Middle Eastern, it was late period, rare, and expensive. White cotton sheets are perfect for undergarments if they are thin enough, and no one should be seeing your underwear, anyway. If you make your own patterns, then they are indispensable for muslin mockups.
Do not feel guilty about dissecting your finds because you will be giving them a home whereas they might have languished indefinitely between the polyester bellbottoms and the scary acrylic ‘80’s sweater. When I purchased my most recent haul I told the cashier that a bag was not necessary as I was just going to cut them up. She was surprised until I elaborated upon their destiny. Then I pointed out the worn seams on the leather jacket and told her not to mourn it.
Save the zippers, buttons, and other notions for modern projects. If you are especially ambitious, save every scrap for appliqué work and/or stuffing pillows. After tedious seam-ripping, wash and dry the separated pieces according to the tag’s instructions. Just because they were pre-owned does not mean that they have been pre-shrunk, I have seen many clothes in thrift stores with the original tags attached. After that you can start laying out your pattern, just watch your grain-lines.

Here's what the wool skirt looks like deconstructed:
How to Make a Cloak Out of an Army Blanket Part I
10:58 PM Posted In crafting , DIY , garb , history , SCA , sewing Edit This 0 Comments »The cloak that I came up with may not be exactly considered “period” by authenticity nuts. I may be nuts and I may have a penchant for accuracy, but I am not the garb police. Luckily, I live in An Tir. Here, most folks are concerned that you are dressed for the weather first and history second. Hypothermia is a possibility when it’s 50°F and overcast, which describes our typical weather patterns year-round. In fact, hypothermia is a greater risk than at 35° because you’re prepared for the temperature, 50 or above is practically shorts weather around here. Many people simply aren’t prepared or overestimate the weather.
Enough with the safety lecture. In summary: wool is not only period, but your friend. Unfortunately, I did not think to take pictures until the cloak was nearly finished. So I am going to give what I call “Idiot Directions.” I assume that anyone reading this has as much experience as I do, if not less. And I can barely operate my sewing machine, Arachne.
As all SCAdians know, thrift stores are a godsend. I picked up an old, green, wool Army blanket and a full, black, flat sheet at Goodwill last year. According to the tag on the blanket it was 3 ¾ pounds, olive green, 66”x84”, 100% shrink resistant wool. Don’t remember how much I paid, but obviously it could not have been much.
I tossed them in the washer on gentle and regular cycles, respectively, and hung the blanket up to dry. There was no fulling, which can happen even on cold. Your mileage may vary. Ironing is recommended, but I was lazy.
I laid down on the blanket lengthwise and marked about where I wanted it to fall, accounting for seam allowance. I am short, so the remainder cut off the bottom was more than enough for a hood. The big piece will be gathered into the body later on. Keep the small section (if you’re tall, there may not be any left over) for a hood, if you desire. If not, you might be able to make hosen out it.
Many (if not most) sheets are sewn off-grain, or crooked. Since they’re woven, you can snip and rip to prepare them. Maybe I’m just destructive, but I like this part. Make a horizontal snip just below the top seam and rip all the way across. Do the same with any remaining seams. You will want to leave any selvage edges. You can do the same instead of cutting to make it the same length and width of the wool. This will be your lining. Don’t forget to leave some aside for the hood, if you want one.
Now pin both main pieces together on three sides and sew. I used a ¾” seam throughout. There really is no “right-side” or “wrong-side,” unless your sheet has one then you’ll want to take that into account. Leave one of the width edges open. Turn the main piece right-side out. If your corners aren’t crisp enough, take a pencil and poke them out. Here is the sewn and turned main piece on my living room floor, thread bits and fuzzballs for that authentic "I'm in the midst of several projects that need to be finished in 2 and a half weeks for Egil's."

For the hood, you will want to start with 32”x18” pieces of both the wool and lining. You may need more, especially if you have a lot of hair. Put them together so you can cut both out at the same time. Fold both over in half length-wise or hamburger style for those of us who never left grade school. Measure out 12” along the long cut edge and mark it. Since I had mine spread out on the floor, I just marked it by pinning through all layers and the carpet. Mark out a gently curving line to the corner of the folded edge. Your two pieces should resemble something like this, the bottom edge will be sewn to the main body. The lining peeking out of the right side is the opening. This piece hasn't been ironed and the peak hasn't been poked out yet. I say sloped because if you go straight it might resemble a KKK hood, especially with the stiff wool. Mine turned out rather pointy. Please excuse the bra straps and the gigantic cold sores that are currently my bottom lip (lots of stress), and these were taken first thing in the morning. In other words, I don't always look so disheveled.
Enough with the safety lecture. In summary: wool is not only period, but your friend. Unfortunately, I did not think to take pictures until the cloak was nearly finished. So I am going to give what I call “Idiot Directions.” I assume that anyone reading this has as much experience as I do, if not less. And I can barely operate my sewing machine, Arachne.
As all SCAdians know, thrift stores are a godsend. I picked up an old, green, wool Army blanket and a full, black, flat sheet at Goodwill last year. According to the tag on the blanket it was 3 ¾ pounds, olive green, 66”x84”, 100% shrink resistant wool. Don’t remember how much I paid, but obviously it could not have been much.
I tossed them in the washer on gentle and regular cycles, respectively, and hung the blanket up to dry. There was no fulling, which can happen even on cold. Your mileage may vary. Ironing is recommended, but I was lazy.
I laid down on the blanket lengthwise and marked about where I wanted it to fall, accounting for seam allowance. I am short, so the remainder cut off the bottom was more than enough for a hood. The big piece will be gathered into the body later on. Keep the small section (if you’re tall, there may not be any left over) for a hood, if you desire. If not, you might be able to make hosen out it.
Many (if not most) sheets are sewn off-grain, or crooked. Since they’re woven, you can snip and rip to prepare them. Maybe I’m just destructive, but I like this part. Make a horizontal snip just below the top seam and rip all the way across. Do the same with any remaining seams. You will want to leave any selvage edges. You can do the same instead of cutting to make it the same length and width of the wool. This will be your lining. Don’t forget to leave some aside for the hood, if you want one.
Now pin both main pieces together on three sides and sew. I used a ¾” seam throughout. There really is no “right-side” or “wrong-side,” unless your sheet has one then you’ll want to take that into account. Leave one of the width edges open. Turn the main piece right-side out. If your corners aren’t crisp enough, take a pencil and poke them out. Here is the sewn and turned main piece on my living room floor, thread bits and fuzzballs for that authentic "I'm in the midst of several projects that need to be finished in 2 and a half weeks for Egil's."
For the hood, you will want to start with 32”x18” pieces of both the wool and lining. You may need more, especially if you have a lot of hair. Put them together so you can cut both out at the same time. Fold both over in half length-wise or hamburger style for those of us who never left grade school. Measure out 12” along the long cut edge and mark it. Since I had mine spread out on the floor, I just marked it by pinning through all layers and the carpet. Mark out a gently curving line to the corner of the folded edge. Your two pieces should resemble something like this, the bottom edge will be sewn to the main body. The lining peeking out of the right side is the opening. This piece hasn't been ironed and the peak hasn't been poked out yet.
I say sloped because if you go straight it might resemble a KKK hood, especially with the stiff wool. Mine turned out rather pointy. Please excuse the bra straps and the gigantic cold sores that are currently my bottom lip (lots of stress), and these were taken first thing in the morning. In other words, I don't always look so disheveled.


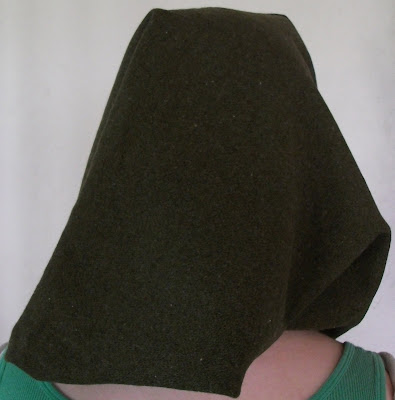
The folded edge will end up being the top of the hood, the straight cut edge will be your facial opening, and the short 12” sides will be the neck. Pin the curved edges of the wool together and sew. Repeat for the lining. Put both pieces together and pin along the opening. I forget which side goes to which. I simply put them on top of my head and arranged them so that all the wrong sides would end up on the inside and all the right sides on the outside. Sew and turn right-side out. I put a couple of stitches by hand at the peak of the hood by hand to keep them together.

